Private rooms are an important feature in every video conferencing application, from virtual interviewing and online education to board meeting breakout sessions, telehealth and more. While your participants are waiting to enter a private room, you can “show them into” a custom lobby waiting room where they will wait until the host accepts them into the meeting.
Daily is a WebRTC based CPaaS that allows you to add live video and audio to any product. As we mentioned in an earlier post, you can start with the Daily Prebuilt user interface or create custom layouts with their client SDKs.
As a custom development firm specializing in building live video applications, our team at WebRTC.ventures has deep experience using video APIs like Daily to build unique video experiences for our clients’ applications.
This post will guide you through a demo on how to add a custom lobby or waiting room into your video application using Daily’s React Hooks library. Daily React Hooks is a helper library for handling common patterns when building custom Daily applications using React. You can see Daily’s demo on how to use the library here.
For this example we’ll use Daily’s demo. If you have GIT installed, you can run the command below to clone it locally. You can also click the “Download ZIP” button under code in the repository:
Once you have the Daily demo downloaded on your local computer, follow their instructions to make it run.
The rest of this post will build on top of that demo in order to add a waiting room. If you’d like to see the full code we use in this demo, we have posted it in our repository here.
By default, the demo application creates a public room where anyone can access the call. In order to have a lobby page, a private room will need to be created. This is the first step.
In order to create private rooms locally, we modify api.js file by doing the following:
From
To
Uncomment following piece of code:
From
To
And adding to the properties object enable_knocking property and set this to true:
Note: Setting this property to true will enable the participants with no token to request access to the host of the call.
We need to define a user to be the owner of the room who will admit the participants waiting in the lobby. To define an owner, we need to create a token for the owner. This means we are going to need a new call to the API. In our example, the owner will be the user that starts the call. All other users will be participants that must wait until they get accepted.
Add a new method called createToken to the api.js file. This new method will allow to request an owner token:
We are using https://api.daily.co/v1/meeting-tokens/ url to request an owner token, since we are sending is_owner property as true.
The next step is to modify App.js file:
Here we are going to return a token. If there is an issue calling the method, then in the error handling we set the room to null, the application state to idle, and set the flag for the api error to true.
<HomeScreen
Since the user that starts the call will be the one defined as owner, we need to pass this method to the HomeScreen component in order to generate a token when the user starts the call.
Note that “startHairCheck” is how Daily refers to starting their prejoin user interface.
Now, we modify HomeScreen.js file in order to create a token when the user start the call:
In the above code, we call createToken prop. This will return the token for the owner which then we use in the startHairCheck function. Such a function will join the user to the room, so we will need it here to define the user as the owner when joining.
Now let’s modify startHairCheck function in App.js file:
In this function, we are going to define a new parameter named token to use in the preAuth function. If a token is defined, we will send it to define the user as an owner of the room specified in the url.
We have now set the room as private and the user that started the call is the owner. Next, we need to make the participants ask to join the call.
The first thing is to define two new statuses in the application:
We add these two new states to App.js file:
Also, we need to save the username that will join the call locally. This way we know who is requesting access to the meeting. To do this, we define a new state variable in App.js file:
After that, we send the set up function for this state variable to HairCheck component as setUserName prop:
In HairCheck.js file, we add the new prop:
We use it in onChange function:
By doing this, we now know the name of the user that is trying to join the call. We can use this information to request access using this username.
We now go back to App.js file and change joinCall function:
This function will do the following:
We are going to make it asynchronous since now we are going to wait for the user to join the call in order to check the access. In the private rooms we have two levels of access to join:
The join method of callObject is being called, we must check what type of access the user has. If the access is lobby, we request full access to the owner of the call. Otherwise, we set the application state as joined:
After we know that the access level is lobby, we set the application state to waiting state. In doing this, the application will know that the user needs to wait for access to the call:
Next, we request access to the call using the requestAccess method of the callObject object and wait for it. We define the name of who is requesting access and the access level requested. In this case, it will be full access:
Also, we will see if the user was granted access or not. We need to verify this in order to set the correct application state:
We are going to manage the new states created in the application:
Since we added these two new states, we can remove some events from App.js file because they are no longer needed:
First, update events constant:
Then, update handleNewMeetingState function:
Update showCall constant:
Create new constants in order to show the lobby of the rejected message, you can add it in the state variables section, below apiError session variable:
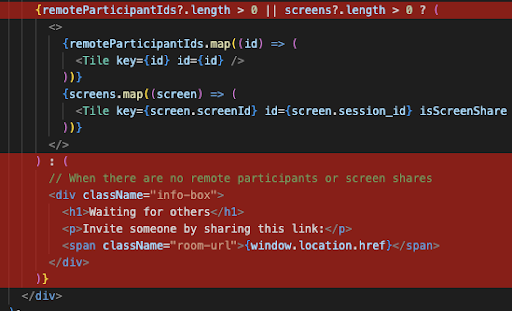
Create the lobby by checking showWaiting constant in renderApp function:
Note: Here you can define a custom page or component that the participants will view while waiting.
Create the rejection message by checking showRejected constant in renderApp function:
Note: Here you can define a custom page or component that the participants will see if their request to join the call is rejected.
At this point, we have defined a user as the owner of the room and the participants are able to request access and wait in the lobby until the access is granted or rejected. All that remains is to notify the owner when someone is trying to join the room.
Modify Call.js file:
We can add the following functions after isAlone constant declaration:
Create a new hook to check if the local user is an owner an the list of waiting participants has at list one participant to set showAdmit variable to true:
In this function we are using updateWaitingParticipants method of callObject object to grant access to all waiting participants, specifying * and setting grantRequestedAccess property to true.
This function is very similar to handleAdmit. We are using again updateWaitingParticipants method of callObject, but instead of setting grantRequestedAccess property to true, we are going to set this to false in order to reject access.
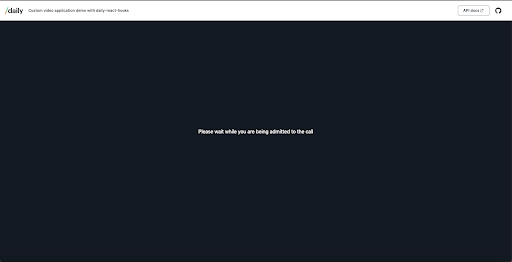
When a participant is trying to access the call the lobby should look like this:
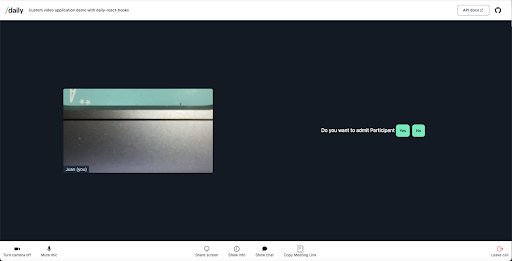
And the host will get the following message:
If you would like a custom Daily live video application built, WebRTC.ventures can help! Contact us today.